How to retrofit an industrial CNC milling machine with LinuxCNC

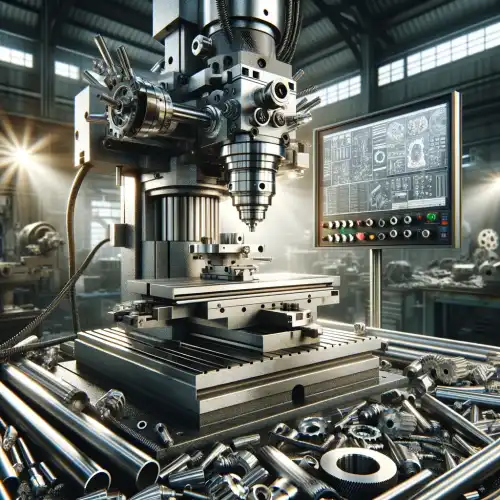
Industrial CNC milling machines can often be purchased on the second-hand market for a tiny fraction of the original purchase price. The mechanical parts are often still in good condition, making these machines the dream of every hobby machinist or small business. Even older industrial machines are miles superior to those for hobby users.
However, there is often one factor that tarnishes the joy of a new machine - an old or defective control system. While the mechanics have not changed much in recent decades, there are new updates to the control software virtually every day. But with a little manual skill, an old control system can be replaced with a new, user-friendly one.
Inventory
The first step is to check which parts of the machine can still be used. Ideally, it should still be in working order or only the control unit should be causing problems.
Mechanical parts such as guides and ball screws can be very expensive and therefore make the whole project unprofitable. For the private user, these do not have to be in perfect condition, but they should not lead to a significant loss of precision.
The most important electronic parts are the axis controllers and the motors. These can also become very expensive, so it is recommended not to replace them as long as they are still working. The position measuring system should also be in good condition, as it has a significant influence on precision.
If the most important parts are in good condition or repairable, you can move on to the next step: gutting.
Removing the old control unit
Proceed with caution here. Electric current can be lethal and a conversion should only be carried out by trained specialists. In addition, damaging a component can quickly cost several hundred or even thousands of euros.
The entire control of the machine should be removed. This includes the display and the main computer, but not things like the measuring system or axis controller.
A plan should be made beforehand and everything should be documented so that you don't end up causing more damage than necessary. Even if you are sure that you can remember everything - one photo or one note too many costs nothing and can save several hours of work at a later time.
Ordering the new control
In this example, we use LinuxCNC as the control system, as it offers great flexibility and has a large community that is happy to help with any questions.
The PC
The "brain" of the control system is the PC. It does not have to be particularly powerful, but it should offer all the necessary connections. You can find a list of suitable PCs here.
Interface cards
So-called interface cards are required to connect the PC to the axis system and the rest of the machine. The most popular variant is the so-called Mesa cards. These (not quite cheap) boards have an FPGA chip, which ensures that the control can take place at maximum speed.
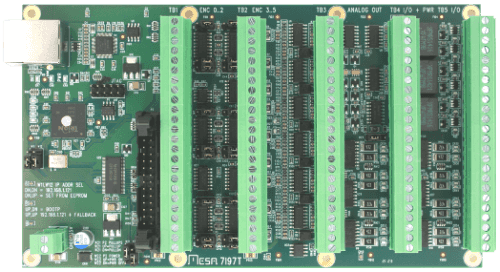
To determine which cards are required, you first need to get an idea of the desired functions. This involves determining how many inputs and outputs are required, how the axes will be controlled, and how the position measuring system will be read out.
Axis drivers usually work with step/dir or analog signals. They often also require an enable signal and have 2 limit switches each. With 3 axes, this would already be 3 axis signals, 6 digital inputs, and 3 digital outputs. The spindle also needs control signals, a lubricant pump may need to be controlled, and so on.
Once you have an overview of the required interfaces, you can use the Mesa Combination Tool to find a suitable combination.
Installing the new control unit
Once all the parts have arrived, you can start installing the new control unit. This should also be done by an electrician.
First, the interface cards are connected to each other and the control PC using the appropriate data cables. All inputs, outputs, and interfaces are then connected to the corresponding machine components. The previously prepared documentation should help with this.
After or during installation, it is important to document the changes. After a year, nobody knows which cable goes where and what was thought of during installation. To ensure that any necessary repairs do not turn into a nightmare, you should take lots of photos and notes and draw up recognizable wiring diagrams.
Installing and configuring LinuxCNC
Now that the manual part has been completed, you can move on to the software.
First, LinuxCNC must be downloaded and installed. Beginners and Linux newcomers should download the entire Debian RT kernel from the official website. Advanced users can also install LinuxCNC on a self-compiled kernel.
Once everything has been installed, you can start with the configuration. The so-called .ini and .hal files are important here.
.ini files
The basic configuration of the system is saved in the .ini files. This includes the user interface used, units of measurement, and an overview of the axes. Instead of writing a new .ini file from the ground up, you can use a sample file and change the necessary parameters.
.hal files
The so-called "Hardware Abstraction Layer", HAL for short, connects the software with the hardware. As, for example, interface card A controls the X-axis via pins 1, 2, and 3, and interface card B uses pins 4, 5, and 6, this assignment takes place with the help of the HAL. Otherwise, new software would have to be written for each possible combination.
HAL connects the software pins, for example, those for controlling the X-axis, with the hardware pins, e.g. pins 1, 2, and 3 on the interface card. This configuration must be made for each input and output used so that hardware and software can communicate optimally with each other.
Testing the function
Once the configuration is completed, the machine can be tested. As errors can easily occur, no one should be near the machine to avoid injury. In addition, one hand should be permanently on the emergency stop switch. The emergency stop switch should not only be realized by software but also by pure wiring to avoid failures.
All functions should then be tested in sequence. The so-called "halshow" tool, which can be used to display all inputs and outputs, can be helpful here.
All safety-critical parts, such as limit switches and brakes, should be tested first before starting to move the motors. You should be very cautious when moving the axes and switching on the spindle. Industrial milling machines often have very powerful motors that can break a person's bones or cause even worse injuries.
First milling operations
Once all tests have been completed and the machine is working properly, the first milling work can be carried out. It is advisable to start with soft material such as foam or wood so as not to cause any damage in the event of an error.
Operating a milling machine requires practice and mistakes are normal, so don't let this discourage you. The most important thing is to use suitable measures and equipment to protect yourself and other living creatures.